blog.tinycities.net

Reader

These are the latest posts at blog.tinycities.net.

from AlphaSmart

The AlphaSmart 3000 has a backup battery, so that it doesn't lose your texts when you replace the regular batteries. You can actually see it through the translucent case – it's right above the “end” key. It's a regular CR2032 button cell, the type that's still widely used, e.g. in the Apple AirTags.

My two AlphaSmart devices came with working backup batteries. One of them even held on to texts that the previous owner had written on it. But since I didn't know how old they really were, I decided to replace them both. Which, fortunately, is a pretty straightforward process.

  • First, switch off the AlphaSmart and remove the three batteries it uses to operate. Leave the battery compartment open.
  • There are eight screws on the bottom of the AlphaSmart. You need to remove them all. There are three screws near the bottom, three in the middle, and another two at the top. They are standard screws with Philips heads, all the same type and length, so you don't have to keep track of which screws belong where.
  • Next, flip the AlphaSmart back up, with the keyboard in front of you.
  • Before you lift off the top cover, be aware that there is a ribbon cable that connects the top and bottom half to the left of the display. So carefully start lifting the top from the right.
  • Unplug the ribbon cable so that you can put aside the top cover.
  • You need something to push the backup battery out of its housing before you can grab and remove it. A small screwdriver should do.
  • Now simply push in the new battery.
  • Don't forget to plug in the ribbon cable before putting everything back together again.

Once you've put in the three batteries again and switch on the device, it will recognise that it was completely without power and will display this message:

An unexpected data change occurred. Did you recently remove or replace the AlphaSmart's lithium backup battery? (Y for yes, N for no)

I didn't actually try what would happen when you answer “no”. Maybe next time.

This will be followed by a note that the AlphaSmart will now restart:

Your AlphaSmart needs to be restarted. You should not see the previous message again. Press the enter key to restart...

Simply press Enter.

And that's it. Your AlphaSmart will now have eight empty files again for you to fill with text. Which it will safely keep even if you remove the batteries.

#AlphaSmart #AlphaSmart3000 #RetroComputing

 
Weiterlesen...

from AlphaSmart

So it turns out I was making things much more complicated than they had to be – again.

After writing on the AlphaSmart some more and transferring the texts over to my MacBook Air, I found a few issues. Some keys couldn't be mapped correctly, eg. the +/= key. And sometimes, it appeared as if BetterTouchTool would stumble and fail to properly remap a key. So I decided to take a step back and look at things all over again.

tl;dr – you don't need BetterTouchTool or Karabiner or any other third party software. MacOS can do it all by itself.

When you connect an AlphaSmart to a Mac, the Mac recognises it as a keyboard and helpfully launches something called the Keyboard Assistant. It guides you through a few simple steps, by which it tries to identify the new keyboard. First, it asks you to press the key to the right of the left shift key. Then you are asked to press the key to the left of the right shift key. It then presents you with what it considers the correct type of keyboard, but also gives you the option to select a different type.

My mistake was assuming that this was all it took. So after that procedure, I tried transferring texts and some of the characters came out wrong, like the question mark, the Z and Y keys were swapped, and others. I missed the obvious and went down the rabbit hole of third party software instead.

But wait – Z and Y are being swapped? Well, of course. Being in Germany, my Macs have German QWERTZ keyboards, whereas the AlphaSmart, being from the US, has a QWERTY keyboard. So of course the Z and Y are swapped when you type “English” on a German keyboard.

In other words, all it took was to add a second keyboard layout to the Mac's settings and to switch to it when text is coming in from the AlphaSmart. Then switch back to the German layout before typing on the German keyboard again.

And that is all it takes. D'oh.

#AlphaSmart #AlphaSmart3000 #RetroComputing

 
Weiterlesen...

from AlphaSmart

I came across the AlphaSmart devices by accident, via a post on the Fediverse somewhere (sorry, can’t remember by whom or when exactly). I was immediately fascinated and, just hours later, was already bidding on two devices on eBay. Two, in case one wouldn’t work. Turns out they both do, but they are also slightly different. More on that below.

About the AlphaSmart devices

But first: The AlphaSmart series of devices were, effectively, a keyboard with an attached 4x40 character liquid crystal display (LCD). A bit like what Freewrite (who, incidentally, own the domain alphasmart.com and redirect it to one of their device offerings) are selling today, but sort-of ahead of their time. There were various models, from the original to the AlphaSmart 3000, Neo and Dana. The latter was, effectively, a PalmOS device with a keyboard. In retrospect, it was probably over-engineered and too much of a departure from the simpler, and thus more attractive, earlier models.

The AlphaSmart Neo was probably the most attractive of the bunch, and still sells for about $100 on eBay whereas its predecessor, the 3000, can be had for about $20 if you’re lucky.

What I got

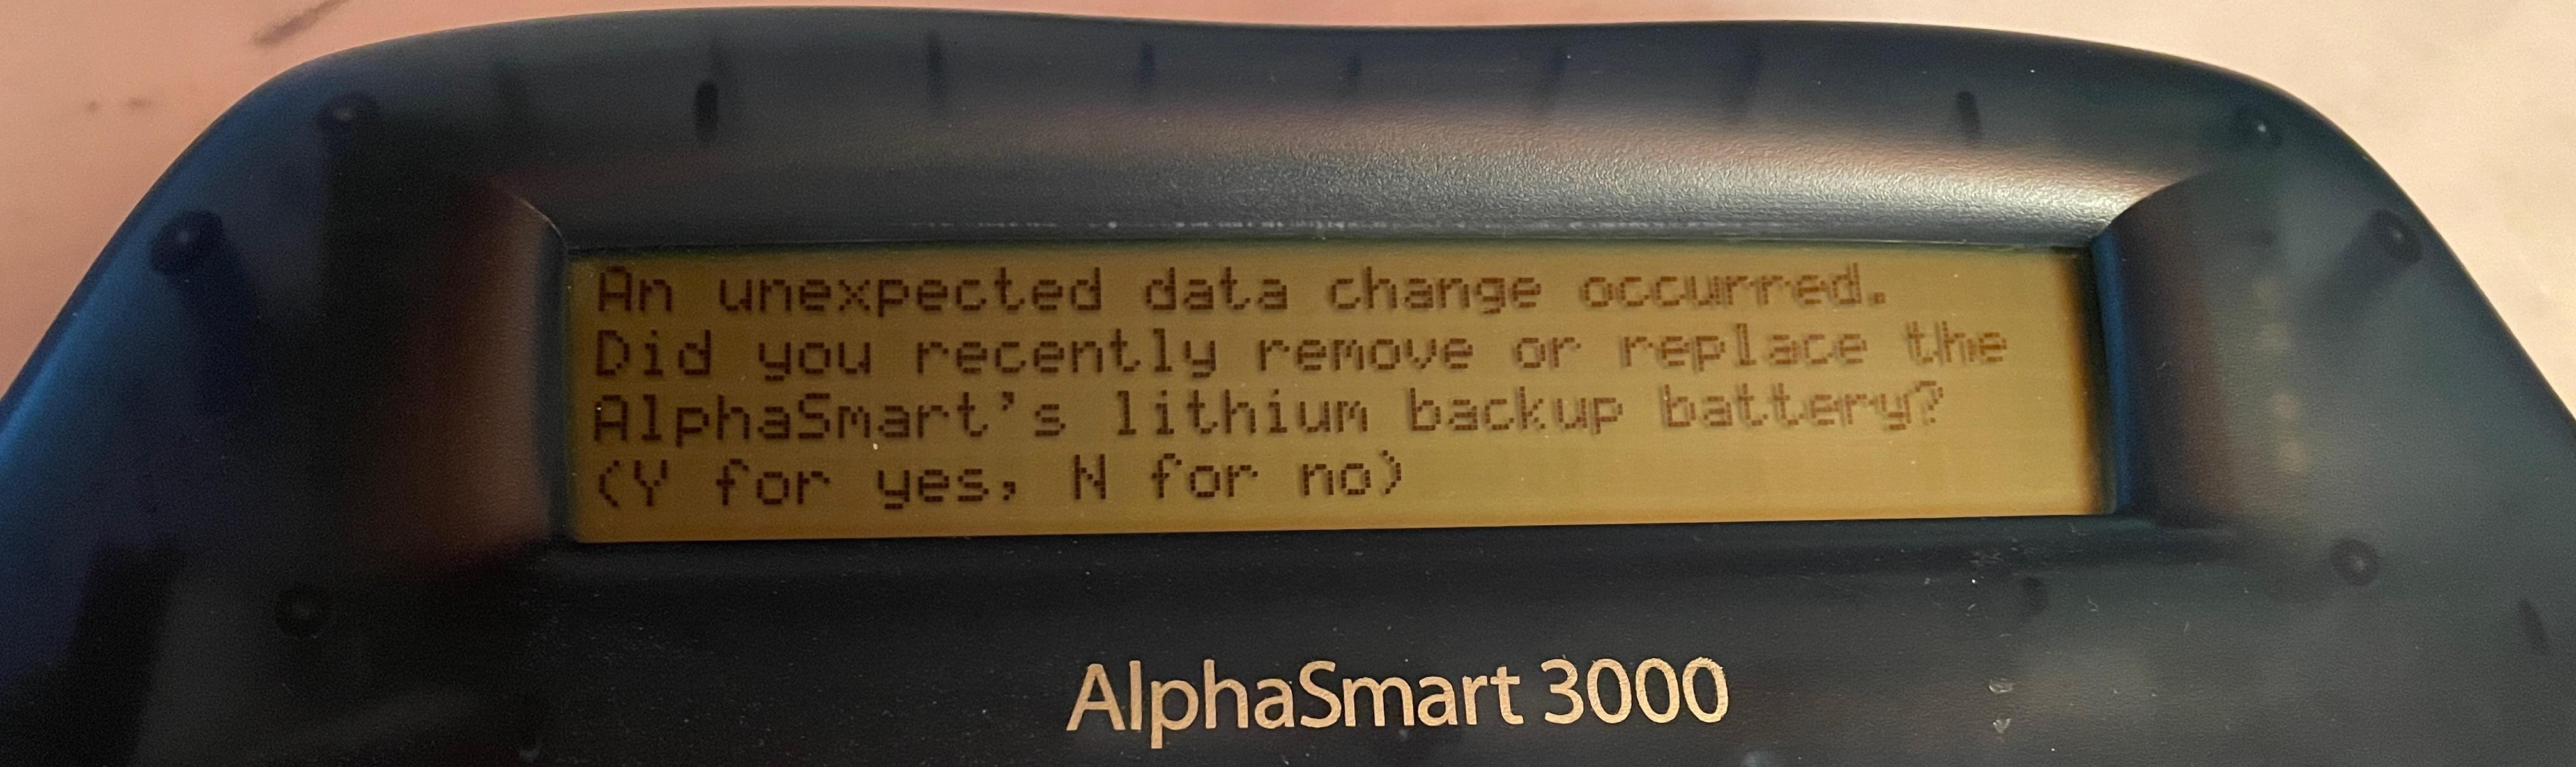
After receiving my two devices, the differences were obvious immediately. Turns out, there are two different hardware versions of the AlphaSmart 3000. The older one, with serial numbers starting with the letters “ALF”, has flat, translucent keys. The newer one, serial number starting with “AS”, has darker, non-translucent keys that are also shaped differently. The entire case is a tad darker, too, and not as translucent as the one of the ALF model. Also, the AS has a battery indicator that will show up on some of the screens.

Two AlphaSmart 3000 devices on a red background. You can see the differences between the keyboards and the casing, as described in the text.

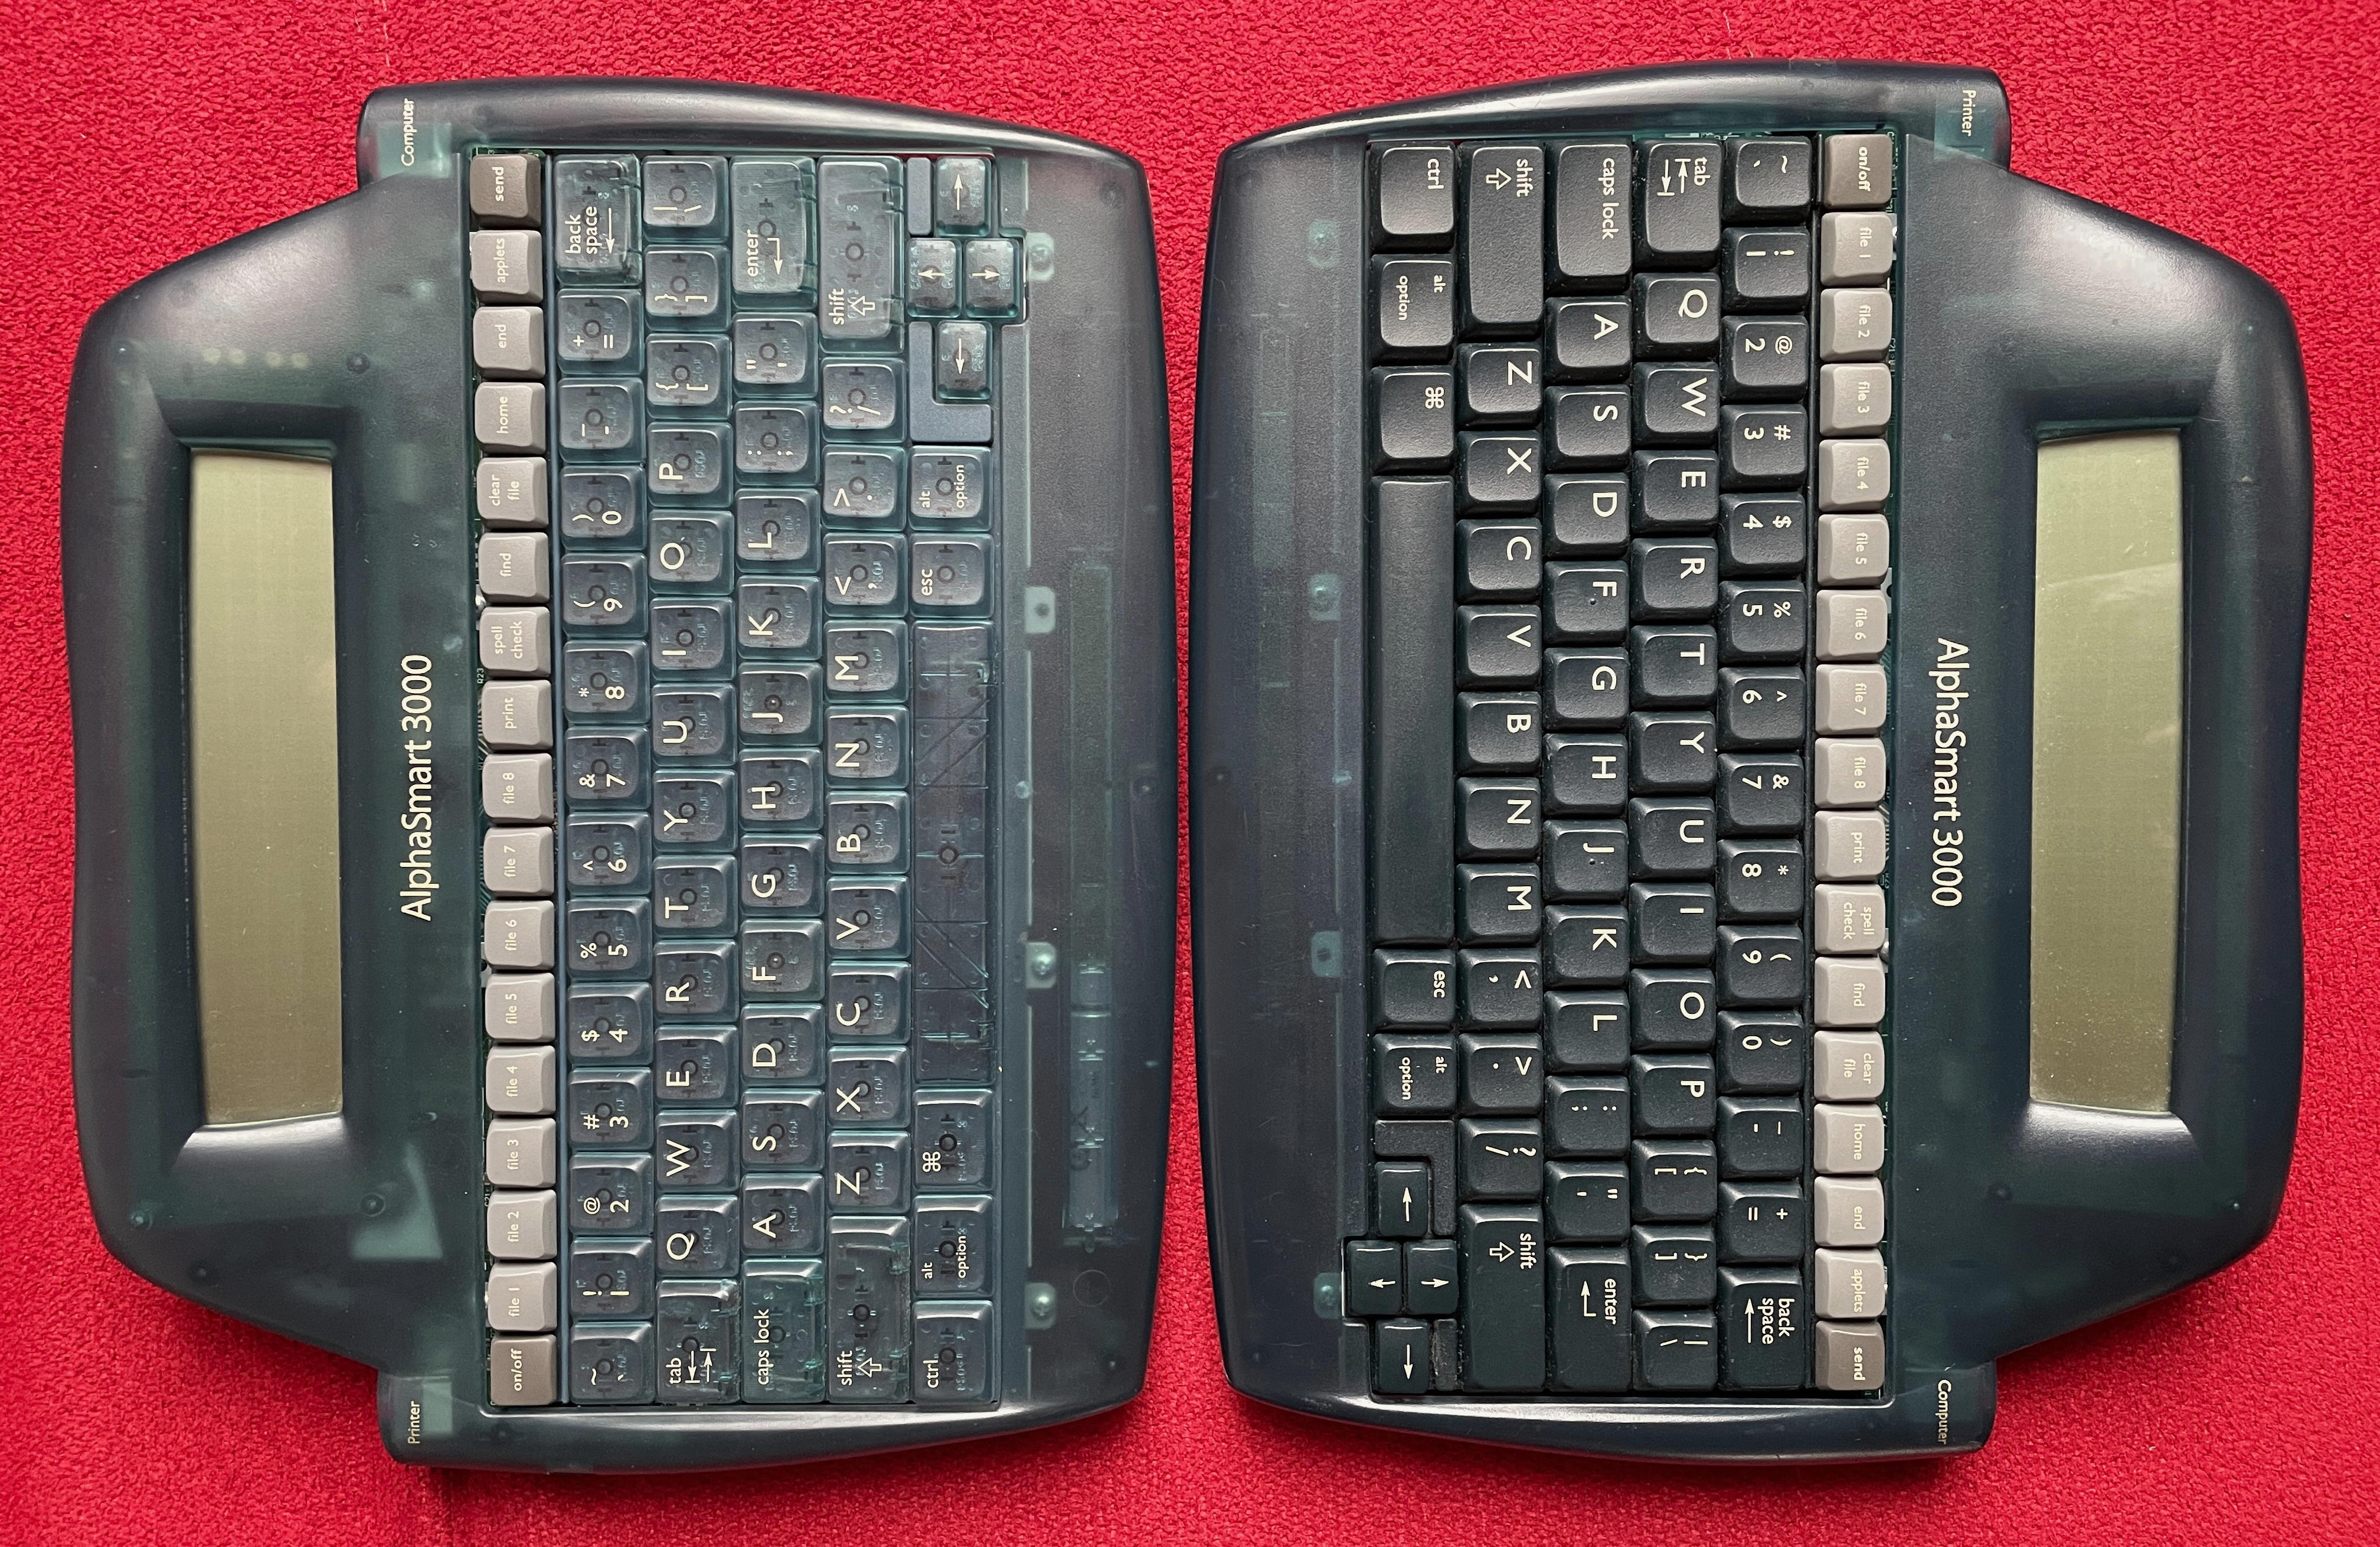
Interestingly, even though the keyboard of the ALF model looks and sounds “cheaper”, I found that I can type on it easier and more reliably than on the AS model. My AS model actually came with a warning from the previous owner that the “z” key would sometimes be hard to press. But in trying it out, I found that to occur with other keys, too. If you don’t hit them square in the middle, they seem to rub against the neighbouring key and won’t fully press down. The ALF model doesn’t have that problem, so I’m typing this on an ALF keyboard (of course I’m drafting this article on the AlphaSmart itself).

Firmware

My two models also came with different versions of the operating system. The ALF has version 1.6 whereas the AS, surprisingly, has version 1.4 – which seems to contradict the theory which hardware revision is the older one. But all the resources I found point to the AS being the newer revision, despite the older firmware.

Supposedly, both models can be upgraded to the last ever released firmware version 3.01 – but you need a working older Windows version for the AlphaSmart desktop software (the AlphaSmart Manager, ASM) to run. I did get it to run on Windows 11, actually, but it won’t connect to the AlphaSmart device.

O-o

One annoying little difference I found: The ALF model with its 1.6 software does not produce on uppercase O umlaut (Ö). When pressing the documented key sequence, Alt-U, Shift-O, it instead produces a Euro sign. The lowercase O umlaut works as expected, though. I haven’t found another way to produce an uppercase O umlaut on that device yet. It works as expected on the AS model with the 1.4 firmware.

Data Transfer and Keyboard Mapping

Data transfer works by connecting the AlphaSmart via an USB cable to a PC or Mac. They also have infrared, but you will be hard-pressed to find something to put on the receiving end these days. The USB port on the AlphaSmart is the B type, the square one you may know from printer cables. So just get a printer cable with a USB-A or USB-C plug on the other end, depending on what your computer has. Then, in theory, just open a word processor or editor on the computer and press the “Send” button on the AlphaSmart. It acts like a keyboard and will type out your text, sending it over the USB cable to your computer. For longer texts, this can take a while, though.

Update: Forget the following paragraph. There’s a much more simple and elegant solution.

(((I’m using Macs and while the AlphaSmart actually recognises that it is connected to a Mac (and says so), I found that a lot of the special and not-so special characters come out wrong. I assume when it says “Mac”, it actually refers to a pre-MacOS X era Mac. In other words, you need something on the Mac end that re-maps the incoming characters. The obvious choice, when searching the web for these kinds of issues, is the freeware Karabiner. To cut things short – that didn’t work out for me. I ended up using the for-pay BetterTouchTool, which does a lot more than just mapping keys. And it still was somewhat tedious and cumbersome to set up the mappings. I had to type the character into a file on the AlphaSmart, send that one character to the Mac, remap it, unplug the AlphaSmart, and start all over again with the next character. But in the end, it worked. You only have to do this once, fortunately, and can transfer your mappings to another Mac in case you want to connect your AlphaSmart to more than one machine.)))

So now I’m going to send this text to my Mac, clean it up a little on a big screen, and publish it on this blog.

#AlphaSmart #AlphaSmart3000 #RetroComputing

 
Read more...

from @dirkhaun XXL

With a robots.txt file, you can block bots, such as search engine crawlers, from accessing parts or the entirety of your website. While you may want to let the usual search engines in, so that others can find your site, you may want to block Large Language Models (LLMs) such as ChatGPT from gobbling up your content.

Here’s what you should add to your robots.txt file to stop ChatGPT, specifically:

User-agent: GPTBot
Disallow: /
User-agent: ChatGPT-User
Disallow: /

The robots.txt file is just a plain text file that goes into the root directory of your webserver, next to where, typically, an index.html file or similar for the homepage would reside (if you’re not familiar with that file, Wikipedia has you covered).

writefreely and the robots.txt

That is, unless you are running writefreely (as the site that you are currently reading does). With the default setup, writefreely will serve all requests, including that for the robots.txt file. And since the writefreely software doesn’t know about the robots.txt, it will throw an error.

Assuming your writefreely blog is at https://example.com, then typing https://example.com/robots.txt into a browser’s address bar should bring up the robots.txt file. If, instead, you’re seeing an error message:

404 page not found

… then your site needs the following addition to the nginx configuration file for your blog:

location /robots.txt {
    alias /home/www/writefreely/robots.txt;
}

You should already have a location directive for the CSS and images of writefreely. Just put the above directive below that section. Make sure to include the full local path (in the file system on your server) behind the alias. If you put your robots.txt next to the writefreely binary, you can copy the part before the “static” from the existing location directive.

Then, all you have to do is to tell your nginx to use the new configuration:

systemctl reload nginx

… and it’s goodbye to ChatGPT gobbling up your writing.

#writefreely #nginx #ChatGPT

 
Weiterlesen...

from @dirkhaun XXL

A couple of days ago I noticed that videos and GIFs were no longer showing up in posts on my #Mastodon instance. Other images were fine, just not animated attachments to posts. I first noticed this in #Ivory, but quickly confirmed that they wouldn’t show up in a browser window either.

A quick restart of the server didn’t fix the problem. Since I didn’t have the time to dig into it, I left it at that for a few more days.

ffmpeg gone missing

Eventually, I got around to look into it. A web search brought me to an older issue on the Mastodon bugtracker. It’s for an older Mastodon release and has since been closed, so shouldn’t really affect my up-to-date instance.

I was about to give the suggested “fix” a try when something rang in the back of my mind …

Mastodon uses ffmpeg for videos and animated GIFs. I vaguely remembered – but couldn’t find it again, of course – something I’ve read a while ago about #Ubuntu randomly uninstalling ffmpeg for no obvious reason.

Lo and behold, ffmpeg was no longer on the server. A quick apt install ffmpeg brought it back – and videos started showing up and playing again.

For the record: The server is running Ubuntu 22.04 LTS.

#MastodonAdventures #RunningMastodon #ffmpeg

 
Weiterlesen...

from @fediversum

Von anderen sozialen Netzwerken kennt man die Kürzel CW (Content Warning) oder TW (Trigger Warning). An den Anfang eines Beitrags gesetzt sollen sie darauf hinweisen, dass der folgende Inhalt vom Leser bzw. der Leserin als heikel angesehen werden könnte. Das setzt natürlich voraus, dass betroffene Personen dann sofort aufhören zu lesen. Gerade wenn Bilder folgen, lässt es sich aber nicht immer vermeiden, dass man doch noch einen Blick erhascht.

In Mastodon gibt es dafür eine bessere Lösung. Genauer gesagt, sogar zwei.

Inhaltswarnungen in Mastodon

Im Editor, in dem Du in Mastodon Deine Beiträge verfasst, gibt es unter dem Beitragstext eine Schaltfläche “CW”. Wenn Du diese aktivierst, wird der Inhalt Deines Beitrags nicht gleich angezeigt. Stattdessen kannst Du einen kurzen Text einblenden lassen, der erklärt, warum Du es für angebracht hältst, erst einmal eine Inhaltswarnung anzuzeigen. Hier solltest Du eine kurze Erklärung eingeben – ein paar Stichworte reichen meistens aus.

Die CW-Option im Mastodon-Editor für neue Beiträge.

Beispiele: “Beschreibung von körperlicher Gewalt”, “Nacktheit”, “Spinne”.

Mit der Option “CW” wird der ganze Beitrag ausgeblendet. Zusätzlich gibt es noch die Möglichkeit, nur die angehängten Medien (typischerweise Bilder) mit einer Warnung zu versehen. Sie werden dann als Platzhalter angezeigt, ohne dass man den Inhalt erkennen kann. Wenn Du ein Bild hochlädst, erscheint unter der Miniatur die Option “Mit einer Inhaltswarnung versehen”. In diesem Fall kannst Du keinen zusätzlichen Text angeben, sondern Mastodon blendet nur den generischen Text “Inhaltswarnung” über den Platzhalter des Bildes ein. Du solltest also in Deinem Beitragstext erklären, was man zu sehen bekommt, wenn man die Bilder öffnet.

Die Option "Mit einer Inhaltswarnung versehen", die erscheint, wenn man ein Bild oder ähnliches als Anhang für einen Beitrag hochgeladen hat.

Wie immer gilt: Die genaue Vorgehensweise zum Erstellen von Beiträgen mit Inhaltswarnungen kann in anderen Clients (Apps, alternative Oberflächen) abweichen. Gleiches gilt für die Anzeige.

Inhaltswarnungen ignorieren

Du kannst die Inhaltswarnungen für Deine eigene Timeline deaktivieren, so dass Du solche Beiträge immer sofort vollständig siehst. Die Option findest Du in den Mastodon-Einstellungen unter “Design”. Dort gibt es zwei Optionen, entsprechend der Inhaltswarnungen für Medien und für ganze Beiträge:

“Beiträge mit Inhaltswarnung immer ausklappen” erklärt sich von selbst: Wenn Du diese Option aktivierst, siehst Du immer den ganzen Beitrag, auch wenn er mit einer Inhaltswarnung (CW) versehen ist.

Für Medien kannst Du wählen zwischen

  • Medien mit Inhaltswarnung ausblenden (das ist die Voreinstellung)
  • Medien mit Inhaltswarnung immer anzeigen (dann bekommst Du sie immer zu sehen)
  • Medien immer ausblenden (dann werden auch Medien ohne Inhaltswarnung immer erst einmal ausgeblendet)

Wann sollte ich Inhaltswarnungen verwenden?

Natürlich werden nicht alle Menschen von den gleichen Themen oder Darstellungen getriggert, aber es gibt doch ein paar Bereiche, für die weitgehende Einigkeit herrscht.

An erster Stelle wohl Nacktheit und allzu freizügige Darstellungen des menschlichen Körpers. Das hat weniger mit Prüderie zu tun als vielmehr mit Rücksichtnahme auf die Situation, in der Deine Leser:innen sich den Beitrag vielleicht ansehen. Im Englischen gibt es dafür die Inhaltswarnung NSFW (Not Safe For Work). Was, wenn sich jemand den Beitrag auf der Arbeit (und sei es in der Mittagspause) oder in der Öffentlichkeit ansieht und genau in diesem Moment jemand über die Schulter schaut?

Dann sind da die Themen, die ein Trauma wieder herauf bringen könnten. Etwa, wenn Du (mit guten Absichten) einen Beitrag über Vergewaltigungen teilst und diesen dann jemand liest, die oder der selbst einmal Opfer geworden ist.

Und natürlich Darstellungen oder Themen, vor denen sich Menschen ekeln könnten, etwa Spinnen oder körperliche Ausscheidungen.

Wie so oft verlaufen auch hier die Grenzen fließend und letzten Endes bleibt es natürlich Deine Entscheidung, wann Du eine Inhaltswarnung verwendest und wann nicht. Im Fediversum wird aber viel Wert auf einen guten Umgangston gelegt und so sind Inhaltswarnungen bei offensichtlich heiklen Themen angeraten.

#Fediversum #FediTips #FediTipps #CW #TW #Inhaltswarnung

 
Weiterlesen...

from @fediversum

Neben der Kommentarfunktion sind Likes (das Sternchen), Boosts (zwei Pfeile im Kreis) und Bookmarks (Lesezeichen) die prominentesten Symbole unter einem Beitrag in Mastodon. Wofür genau sind diese Funktionen eigentlich?

Die im folgenden beschriebenen Icons, von links nach rechts: Boost, Like, Bookmark

Likes

Mit einem Klick auf das Sternchen deutet man an, dass man den Beitrag mag (engl. like). Das ist alles – mehr passiert hier nicht.

Anders als etwa bei Twitter hat ein Like also keine Auswirkungen auf das Ranking eines Beitrags – einen entsprechenden Algorithmus, in den die Bewertung einfließen würde, gibt es bei Mastodon eh nicht.

Infolgedessen liest man manchmal die Empfehlung, statt zu liken lieber zu boosten (dazu gleich), denn nur jene Funktion erhöht die Sichtbarkeit eines Beitrags im Fediversum. Tatsächlich sind es aber zwei separate Funktionen, die man auch – der Situation angemessen – unterschiedlich verwenden kann und sollte.

Letzten Endes sieht ein Like mit Sicherheit nur der Autor oder die Autorin des Beitrags. Man kann damit, ganz banal, ausdrücken, dass man den Beitrag gut findet – aber nicht so wichtig, dass man ihn auch mit anderen teilen möchte. Das kann durchaus sinnvoll sein, etwa zur Bestätigung, im Sinne von “ich habe es gesehen” und “ich stimme dem zu” oder auch “ich fühle mit Dir”. Nicht alles muss man an die große Glocke hängen.

Boosts

Mit einem Klick auf die beiden Pfeile “boostet” man einen Beitrag und teilt ihn mit den eigenen Followern. Im Fediversum ist das – mangels Algorithmus – die einzige Möglichkeit, einem Beitrag mehr Aufmerksamkeit und eine größere Leserschaft zu verschaffen. Daher wird oft auch empfohlen, großzügig zu boosten.

Ein Boost entspricht also einem “Retweet” bei Twitter. Es gibt allerdings (noch) nicht, wie dort, die Möglichkeit einen Boost mit einem Kommentar zu versehen. “Quote Tweets” waren lange Zeit im Fediversum verpönt, da sie auf anderen Plattformen oft dazu benutzt werden, um über den zitierten Beitrag herzuziehen. Es wird oft – im wörtlichen Sinn – “über” die zitierte Person gesprochen, nicht wirklich mit ihr.

Doch es gibt auch Situationen, in denen ein paar erklärende Worte, warum man einen Beitrag mit den eigenen Followern teilt, helfen würden. Etwa, um Kontext herzustellen. Mittlerweile gibt das Fediversum den Widerstand gegen “Quote Boosts” langsam auf. Viele Apps erlauben sie schon bzw. stellen Beiträge, in denen die URL eines anderen Beitrags eingefügt wurde, als Zitat dar. Und auch auf der Roadmap (Liste der geplanten Entwicklungen) für Mastodon stehen sie mittlerweile. Der Umgangston im Fediversum ist – bisher zumindest – doch ein ganz anderer als auf anderen Plattformen. Es bleibt zu hoffen, dass sich die Befürchtungen gegenüber Quote Boosts nicht bestätigen werden.

Bookmarks

Mit einem Klick auf das Lesezeichen-Symbol markiert man einen Beitrag als Bookmark. Ähnlich wie bei Likes war das schon alles. Bookmarks erscheinen in einer separaten Liste und stellen einfach nur eine eigene Funktion dafür zur Verfügung, für das Likes auf anderen Plattformen oft eh benutzt wurden: Neben der Zustimmung vor allem als einfache Möglichkeit, den Beitrag wieder zu finden.

Da es in Mastodon keine Volltext-Suche über Instanzen hinweg gibt, kommt der Bookmark-Funktion daher noch einmal eine besondere Bedeutung zu. Verweist ein Beitrag auf etwas, dass Du Dir lieber noch einmal in Ruhe ansehen willst? Setze ein Lesezeichen.

Anders als bei Likes wird bei Bookmarks keine Zahl angezeigt, wie viele Benutzer den Beitrag markiert haben.

Noch ein Wort zu den Zahlen

Durch die Natur des Fediversums mit seinen vielen Instanzen sind die Zahlen der Likes und Boosts unter dem Beitrag einer anderen Person nicht notwendigerweise korrekt. Oft hat die Information über ein Like die Instanz, auf der Du den Beitrag siehst, noch gar nicht erreicht.

Zuverlässig sind die Zahlen nur für die eigenen Beiträge oder wenn man sich einen Beitrag auf der Heimat-Instanz der Person, die ihn geschrieben hat, ansieht.

#Fediversum #FediTips #FediTipps #Like #Boost #Bookmark

 
Weiterlesen...

from @fediversum

Manchmal will – oder muss – man zu einer anderen Mastodon-Instanz wechseln. Etwa, weil man eine Community gefunden hat, der man sich eher zugehörig fühlt. Oder, auch das kommt leider vor, weil die bisherige Instanz schließt.

Der Umzug an sich ist ganz einfach, da die Mastodon-Software diesen unterstützt. Es gibt allerdings ein paar Einschränkungen zu beachten, insbesondere für den Fall, dass die alte Instanz schließt.

Der Umzug

Der Umzug zu einer anderen Instanz ist an sich recht einfach und verläuft weitgehend automatisch. Man legt dazu zunächst auf der neuen Instanz ein Konto an. Dieses kann, muss aber nicht, den gleichen Benutzernamen wie vorher tragen (nur der Instanzname wird sich, offensichtlich, unterscheiden).

Ist das neue Konto angelegt, kannst Du dort in den Einstellungen unter “Konto” auf den Punkt “Von einem anderen Konto umziehen” klicken. Hier trägst Du den vollständigen Namen Deines bisherigen Kontos ein.

Danach meldest Du Dich noch einmal bei der bisherigen Instanz an und teilst dieser den Umzug mit. In den Einstellungen, ebenfalls wieder unter “Konto”, gibt es dort den Punkt “Zu einem anderen Konto umziehen”. Hier trägst Du Dein neues Konto ein und bestätigt mit dem Passwort (der alten Instanz). Auf der Seite wird auch erklärt, was beim Umzug alles passiert – und was nicht.

Nun wird der Umzug eingeleitet und die beiden Instanzen erledigen den Rest. Sowohl Deine Follower (also alle Accounts, die Deinem bisherigen Konto gefolgt sind) als auch Deine Followings (also alle Accounts, denen Du mit Deinem bisherigen Konto gefolgt bist) werden automatisch mit umgezogen. Dieser Vorgang kann eine Weile dauern. Am einfachsten lässt Du ihn über Nacht laufen.

Was nicht mit umgezogen wird

So weit, so einfach. Bei diesem Umzug werden aber wirklich nur Deine Follower und Followings zwischen den beiden Instanzen übertragen, sonst nichts. Das betrifft also Deine Einstellungen (Filter, geblockte oder stummgeschaltete Accounts), Dein Profil – und auch Deine bisherigen Beiträge.

Immerhin – vieles davon kannst Du exportieren und zum Teil auch wieder auf der neuen Instanz importieren. Gehe dazu auf der alten Instanz in den Einstellungen zum Punkt “Importieren und exportieren”. Dort findest Du die Möglichkeit, Deine Listen, Lesezeichen, gesperrte Accounts und Domains sowie stummgeschaltete Accounts zu exportieren. Und diese kannst Du unter dem gleichen Punkt auf der neuen Instanz wieder importieren.

Und was ist mit den alten Beiträgen?

Deine Beiträge auf der alten Instanz werden nicht mit umgezogen und können auch nicht von Hand exportiert und wieder importiert werden. Im Normalfall, so die Idee, würden die alten Beiträge einfach auf der alten Instanz verbleiben. Schließlich haben diese ja eine eindeutige URL, unter der sie bisher und auch zukünftig zu finden sein werden. Sie haben zudem Likes, Boosts, Lesezeichen und Kommentare – all das müsste bei einem theoretischen Umzug ebenfalls aktualisiert und die Änderungen allen zig-tausenden Mastodon-Instanzen mitgeteilt werden. Alleine solche Umzüge würden jeden Tag eine enorme Menge an Datentransfer verursachen.

Tipp: Du kannst Beiträge, die Dir wichtig sind, mit einem Boost auf Dein neues Konto bringen. Nachdem Du das neue Konto angelegt und bevor Du den Umzug – wie oben beschrieben – anstößt, kannst Du mit Deinem neuen Konto die wichtigsten alten Beiträge boosten. So erscheinen sie in Deiner neuen – bisher noch leeren – Timeline auf der neuen Instanz. Und Du belästigst Deine Follower nicht mit alten Beiträgen, denn die sind ja noch nicht umgezogen worden und folgen dem neuen Konto noch gar nicht.

Und wenn die alte Instanz schließt?

Wenn die Instanz Deines alten Kontos schließt, werden damit auch Deine alten Beiträge aus dem Web verschwinden. Da hilft dann auch der Trick mit dem Boost nichts mehr – für diesen Fall gibt es derzeit keine elegante Lösung.

Du kannst immerhin auf Deiner alten Instanz ein Archiv Deiner alten Beiträge anfordern und herunterladen, wieder in den Einstellungen unter “Konto” und “Importieren und exportieren”. Dort findest Du den Button “Dein Archiv anfordern”. Somit hast Du Deine alten Beiträge wenigstens selbst noch und kannst diese ggfs. auch noch einmal auf der neuen Instanz veröffentlichen.

#Fediversum #FediTips #FediTipps #Umzug

 
Weiterlesen...

from @fediversum

Im #Fediversum gehören Bildbeschreibungen zum guten Ton. Wenn Du Deinen Beitrag also mit einem oder mehreren Bildern illustrierst, werden Deine Leser:innen es begrüßen, wenn Du zu jedem Bild auch eine Beschreibung mitlieferst.

Das geschieht nicht nur aus Rücksicht auf Menschen mit Sehbehinderungen. Auch so manche:r Deiner anderen Leser:innen wird Dir für die eine oder andere Bildbeschreibung dankbar sein. Denn nicht immer ist es für Dritte unmittelbar ersichtlich, was auf dem Bild wirklich zu sehen ist. Abgebildete Personen etwa kann nicht jede:r zuordnen, Memes oder Bezüge zu (vermeintlich) bekannten Serien oder Filmen sind eben doch nicht allen vertraut, usw.

Beschreibung hinzufügen

Der Hinweis "Keine Beschreibung hinzugefügt", der direkt nach dem Hochladen einer Medien-Datei erscheint.

Wie genau Du eine Bildbeschreibung hinzufügst, hängt im Detail von Deinem verwendeten Client ab. In der Mastodon-Weboberfläche etwa erscheint direkt nach dem Hochladen des Bildes der Text “Keine Beschreibung hinzugefügt” über der Miniatur des Bildes. Du kannst einfach auf diesen Text klicken und eine Beschreibung eingeben.

Der Editor für die Bildbeschreibung. Dort wird auch darauf hingewiesen, dass man den Kreis auf der Bildvorschau so positionieren kann, dass dieser Ausschnitt in der Vorschau des veröffentlichten Beitrags in der Mitte stehen wird. Die Bildbeschreibung kann bis zu 1500 Zeichen lang sein. Es wird auch eine Option angeboten, Text im Bild zu erkennen.

Manche Apps haben auch eine eingebaute Erinnerungsfunktion (die man ggfs. erst aktivieren muss), um Dich vor dem Absenden des Beitrags an eine evtl. vergessene Bildbeschreibung zu erinnern.

Was soll ich beschreiben?

Wie Du Dein Bild beschreibst hängt natürlich vom Kontext und vom Zweck ab. Es müssen keine Romane sein, aber allzu einsilbige Beschreibungen helfen dem Leser oder der Leserin ja auch nicht weiter.

Nehmen wir beispielsweise ein Bild vom Abendrot. Ist es ein Foto, dass Du gerne vorzeigen möchtest? Dann beschreibe es genauer. Oder verabschiedest Du Dich nur für die Nacht? Dann fungiert es ja eher als Symbolfoto und es reicht auch eine eher oberflächliche Beschreibung.

Bilder mit viel Text sollte man ohnehin vermeiden, schließlich sind bei Mastodon bis zu 500 Zeichen pro Beitrag erlaubt – warum den Text dann nicht gleich als Text posten? Text in Screenshots kann man auch nicht in der Größe ändern (außer natürlich, das Bild groß zu ziehen, aber dann verpixelt es vielleicht nur). Wenn also Text im Bild ist, solltest Du mindestens den relevanten Teil auch in die Bildbeschreibung packen.

Vielleicht hilft als Faustregel: Wie würdest Du jemandem das Bild übers Telefon beschreiben?

Tipp: Betriebssysteme haben mittlerweile auch oft eine Texterkennung eingebaut. In macOS und iOS etwa kann man Text in Bildern ganz einfach markieren und kopieren und so einfach in die Beschreibung (oder gleich in den Beitrag) übernehmen.

Weiterführender Beitrag: Das Regionale Rechenzentrum Erlangen (RRZE) hat einen guten Artikel zum Thema Bildbeschreibungen, mit Tipps von Menschen mit Sehbehinderungen.

Fehlende Bildbeschreibungen

Wenn Du die Bildbeschreibung einmal vergessen hast und sie noch nachträglich hinzufügen willst, musst Du derzeit leider noch das Bild aus dem Beitrag löschen und dann neu, dieses Mal mit der Beschreibung, hochladen. Hier bleibt zu hoffen, dass es in der Mastodon-Software bald noch erlaubt wird, nicht nur den Text eines Beitrags sondern auch die Bildbeschreibung nachträglich zu korrigieren.

Übrigens gibt es viele Menschen im Fediversum, die Beiträge ohne Bildbeschreibungen nicht boosten mögen. Wenn Du jemanden darauf hinweisen willst, dass er oder sie keine Beschreibung verwendet hat, bleib bitte höflich und konstruktiv. Du kannst die Bildbeschreibung ja auch als Kommentar zu dem Beitrag hinterlassen, so anderen helfen und für die ursprünglich postende Person eine Vorlage liefern.

P.S. Quellenangaben

Und weil das auch immer gerne vergessen wird: Bei Bildern oder Fotos, die nicht von Dir selbst stammen, freuen sich der oder die Urheber:innen über eine Quellenangabe.

#Fediversum #FediTips #FediTipps #Bilder #Fotos #Beschreibung

 
Weiterlesen...

from @fediversum

Eine Sammlung nützlicher Browser-Erweiterungen, die die Interaktion mit Mastodon-Instanzen im Web angenehmer und effektiver gestalten.

Liken etc. auf anderen Instanzen

Um interessante Beiträge und Accounts zu finden, die die eigene Instanz vielleicht noch nicht erreicht haben, kann man auch die öffentliche Timeline einer anderen Instanz lesen und z.B. einfach mastodon.social im Browser aufrufen. Ein Account auf der Instanz wird dazu nicht benötigt.

Wenn man dort nun aber einen Beitrag liken oder boosten will und auf das entsprechende Icon klickt, öffnet sich ein Dialog, der einen auffordert, eine URL in das Suchfeld der eigenen Instanz einzugeben und den Beitrag dann dort zu liken/boosten.

Das funktioniert zwar, ist aber umständlich. Einfacher geht es mit einer Browser-Erweiterung. Die Erweiterung Graze for Mastodon gibt es für Chrome/Chromium-basierte Browser sowie für Firefox. Alternativ gibt es die Erweiterung FediAct, ebenfalls für Chrome/Chromium und für Firefox.

Beide Erweiterungen funktionieren so, dass man in der Erweiterung die Zugangsdaten für die eigene Mastodon-Instanz hinterlegt und anschließend auf fremden Instanzen, auf denen man nicht angemeldet ist, trotzdem mit einem Klick Beiträge liken, boosten und bookmarken sowie Benutzern folgen kann. Für Kommentare wird man zwar doch wieder auf die eigene Instanz umgeleitet, aber so, dass man direkt den Kommentar schreiben und abschicken kann.

Mastodon-Benutzer über deren Webseite finden

In Mastodon “verifiziert” man sein Profil, indem man einen Link auf z.B. seine Homepage einträgt und dort wiederum einen Link zurück auf das eigene Mastodon-Profil hinterlegt.

Wenn man im Web unterwegs ist und etwa als Folge einer Suche auf einer Webseite landet, denkt man in dem Moment vielleicht nicht daran nachzusehen, ob die Person oder Institution auch auf Mastodon vertreten ist. So verpasst man aber vielleicht eine neue Informationsquelle.

Die Erweiterung StreetPass for Mastodon, erhältlich für Chrome/Chromium und für Firefox, achtet im Hintergrund auf Mastodon-Links und stellt diese in einer einfachen Liste bereit, auch wenn man die Webseite schon geschlossen und die URL wieder vergessen hat.

Bildbeschreibungen sichtbar machen

Auf Mastodon und allgemein im Fediversum zählt es zum guten Ton, Bilder mit einer Beschreibung zu versehen. Das hilft nicht nur Menschen mit Sehbehinderungen sondern oft auch anderen, besser zu verstehen, was in dem Bild eigentlich zu sehen ist bzw. warum es zum Beitrag hinzugefügt wurde.

Die Erweiterung Social visual alt text (für Chrome/Chromium und für Firefox) zeigt die Bildbeschreibung unter dem Bild an, so dass man sie direkt lesen kann, ohne erst mit der Maus auf das Bild zu gehen und auf das Popup mit dem Text warten zu müssen. Und sie zeigt mit einer roten Markierung, wenn die Bildbeschreibung vergessen wurde.

#Fediversum #FediTips #FediTipps #Browser

 
Weiterlesen...

from @dirkhaun XXL

So Mastodon’s infamous Media Cache for this instance has stabilised and was running fine for the last two-and-a-half months. Still, the extra volume required some monitoring, and it does cost extra; not a lot, but quite a bit when seen in relation to the vServer’s base cost. So I was looking at the Cloud options again.

Picking a Cloud Service

Initially, I was skeptical about the cloud option, mainly because I wasn’t sure what it would cost me. Since I now have a better idea how much space this instance needs and since it turned out that cloud storage is not so expensive to begin with, I was ready to take the plunge.

In the end, I simply went with the instructions by Thomas Leister and the cloud service he was using, Scaleway. Details will differ between cloud services, whereas the costs are comparable. So if you’re looking for an alternative, try the instructions by Stanislas for Wasabi.

I don’t have much to add to Thomas’ instructions. If you’re looking for a cloud service based in Europe, Scaleway seems like a good option. You can also pick the location of the data center. Their web interface can be a bit overwhelming – just make sure you’re booking the Object Storage. That’s the one you want – ignore all the others.

Then just follow Thomas’ instructions (which sometimes link back to Scaleway’s help pages). Also, make extra sure you replace the default names that Thomas uses with the ones you chose for your instance and your server location. For example, I overlooked the line:

S3_BUCKET=instance-media

Things seemed to work, but all images in posts were missing and instead displayed an “not available” message. So if something is not working as expected, go over all these names, URLs, and keys again carefully. And don’t forget to restart nginx and/or Mastodon itself.

One important bit I learned: You still want to maintain a (small) local cache, since outgoing traffic (i.e. out of the cloud service) costs money. You can avoid having to serve (and therefore pay) for the same file being sent over and over by configuring nginx with a local proxy. Thankfully, both Thomas and Stanislas explain how to do that in their instructions.

Thomas’ instructions cut off a bit abruptly and left me with a “now what?” For that part, switch over to Stanislas, who shows how to check if everything is working using curl. And then concludes: You can now remove your public/system folder on your server! :D

This actually gave me pause. What I had failed to realise was that I was not only moving the cache to The Cloud but also any media that are being uploaded directly onto my instance. This felt a little like losing control over these assets. But then again, I can still download them via the cloud provider’s web interface, if need be. Or do a data export for my account. And it’s not like they were easily accessible in the first place, but buried deep down in some subfolder. So yeah, go ahead and delete that directory (once everything works).

What next?

I still have a problem that sometimes avatars are not loading. My hunch, based on some logfile entries I saw, is that some process is running out of memory when doing this. So I’m considering upgrading to a more beefy vServer. Since the extra cost for the second volume is now gone and the cost for the cloud storage is lower (hopefully), this is something I will look into next.

#MastodonAdventures #RunningMastodon

 
Weiterlesen...

from @dirkhaun XXL

Rockers is a quirky little story with a Robin Hood-influenced ending, set in 1970s Jamaica, where everybody and their brother are in a Reggae band. They are all recording their songs onto 45s and selling them through little shops.

Our hero, who goes by the nickname Horsemouth, plays drums in various bands, but he really wants to become a record dealer, buying them from the little pressing plants and selling them on to the shops. For this, he needs a motorbike, which he gets by borrowing and scraping together the money, only to have it stolen from him on his very first round.

He manages to steal it back from what turns out to be organized crime. They don’t like that and have him beaten up. For his revenge, he summons his friends with trucks, and together they not only raid the warehouse of stolen goods but also the Mafia boss’ home, taking everything from the kitchen equipement to what’s in the living room.

The movie ends with all the liberated goods being lined up along the poor neighbourhoods – TV sets, fridges, sofas, bikes, etc. – so that everybody can take what they need.

It takes a good 1:40 hours to tell that story and there’s lots of music, of course. Almost all the dialogue is in Patois, which is hard to understand even from the subtitles. Enough to follow the story, but you may want to watch the movie twice to be sure you get everything.

#Movies #MovieReview

 
Weiterlesen...

from @dirkhaun XXL

(for now)

So a week after my Mastodon instance ran out of disk space, and after moving the cache to a separate volume, that volume also filled up completely. Oh well. At least the instance kept on running this time. It just couldn’t, well, cache things any more.

I haven’t had a chance to look into moving the cache to a cloud provider. And by the rate things are going, I’m not sure if I really want to, since I have to wonder if this could potentially ruin me with excessive additional costs.

As a short-term measure, I increased the available disk space some more; and then some more again. Good thing that these days all of these things are virtual and can be scaled easily with a few clicks. And then I started looking into understanding what was actually taking up so much space and how to possibly keep it at bay.

But first, a mysterious error message

But first, I had to figure out another problem that had been popping up with that additional volume. Mastodon’s “bundle” task would complain about the new volume being a read-only file system, even though it wasn’t and the Mastodon user could create and delete files and directories without a problem when logged in directly. I got it working somehow two or three times, but the problem would always reappear whenever I fiddled with some other configuration option.

Eventually I found an unrelated, yet helpful forum post that pointed me in the right direction: Mastodon’s config files in /etc/systemd/system/mastodon-* all have an entry ReadWritePaths which by default only points to the live directory in the Mastodon user’s home directory. Adding the new volume as an additional item to these lists finally got rid of the problem.

Taming the cache

Back to the cache. What, exactly, is taking up so much space? There are four sub directories in the cache directory and the culprit can easily be identified: It’s the media_attachments.

In my case, after a week, that directory alone took up 19 GB and therefore the majority of the 25 GB I had allocated solely for the cache. Forget about the preview_cards (the other directory that is regularly cleaned up by a cronjob), they are only a few hundred MB. That’s nothing in comparison.

My solution, for now at least, is to only keep the media attachments for 2 days (and make sure the cronjob actually runs):

RAILS_ENV=production /home/mastodon/live/bin/tootctl media remove --days 2

Disk usage of the cache directory has now been stable over the Christmas weekend and I hope it will stay this way while I consider my next steps.

#MastodonAdventures #RunningMastodon

 
Weiterlesen...